
Vortex Mod Manager User Guide
I wrote this back in 2018 and I provide it here basically AS-IS. I’ve added a few notes with updates here and there, but I have not extensively updated this guide. That said, it should still be very useful.
After seeing that a lot of people are having trouble using Vortex, I thought I would share some tips from my own experience. I’m not a modding expert, but I have tinkered with Fallout 4 a lot, and I haven’t had any extensive issues with Vortex in spite of running hundreds of mods.
Building a load order with Vortex is an entirely different system from previous mod managers. If Vortex is your first Mod Manager, you’ll have an easier time than people switching. If you are completely new to modding, make sure you read some guides on how to set up your game and the basics of modding. This guide is aimed at people switching over from NMM or MO2, who already have a solid grasp on the basics.
Please note that Vortex is still in early BETA – Bugs are inevitable. (Vortex is now post version 1.0 and I haven’t experienced any serious bugs in ages.) I have included in my advice here some basic troubleshooting and best practices for avoiding bugs. In general, the support forums for Vortex are helpful, and the devs themselves make regular appearances there and occasionally help out, so please go there to resolve bugs with the program.
Because Vortex is newer than NMM or MO2 and has more bugs, many mod authors on the Nexus advise against using it or say explicitly that you shouldn’t install their mods with it. (I haven’t seen this in the last few months with the except of Weaponsmith Extended, so you’re not likely to see it anymore.) Mod authors may do this because they don’t want to deal with bugs in the mod manager itself while trying to provide technical support for their mods. Like NMM and MO2, Vortex can install anything into the Data folder. The only mods that cannot be installed with Vortex, are ones that cannot be installed by any mod manager. Very large mods that have always needed at least a partly manual installation (like Weaponsmith Extended) will still need this. Basically, you can use Vortex as a direct replacement for NMM for virtually every mod author’s installation instructions. Just be aware if you need to ask for help, that mod authors who say to not use Vortex may not be willing to offer you support if you have problems.
Setting Up Vortex
Installation and setup for single drive users is straight forward. Following the installation and set up guides provided by Nexus will be fine. If you’re using a multiple drive system, you might want to use the Custom Install Location version of Vortex, but in my experience, it is a little buggier than the standard install version. (It was harder to set up back in 2018, but it’s working fine in the 1.0+ version). The developers strongly recommend that you install Vortex on the C:\ drive, however, you can install it anywhere. My copy of Vortex is installed to D:\Games\Black Tree Gaming Ltd\Vortex. Custom Install Location users will likely get a “No Deployment Method Available” error after adding their games. I go over how to fix this in the File Configuration section.
Adding Games
After launching Vortex for the first time, it should automatically detect your games. Tell it which games to manage by navigating to Games -> Discovered.
Once a game has been discovered, you can press the + icon on the game’s thumbnail to tell Votex you want it to handle mods for that game. (Just ignore my copy of Stardew Valley hanging out in the photo.)

If for some reason your games aren’t appearing, you can click the QuickScan button I have pointed out with blue there. As I already have Vortex set up, Fallout 4 is no longer appearing in the Discovered tab. It has been moved to the Managed Tab, and in fact, as you can see in the upper left corner, Vortex is currently in Fo4 mode.
If you get a “Mods Cannot Be Deployed” or “No Deployment Method Available” error after adding your games (which you probably will if you installed Vortex to a secondary drive), than read through the following File Configuration section and follow the directions there.
File Configuration
This should fix the “No Deployment Method Available” error. Navigate to Settings -> Mods.
Choose a location for your Mod Staging Folder. If the folder doesn’t exist, Vortex will create it automatically after you click “Apply.” If you have a multi-drive set up, for Fallout 4, this folder must be on the same drive that the game is installed on.
As you can see, mine is set to: D:\Games\Vortex Mods\{GAME}
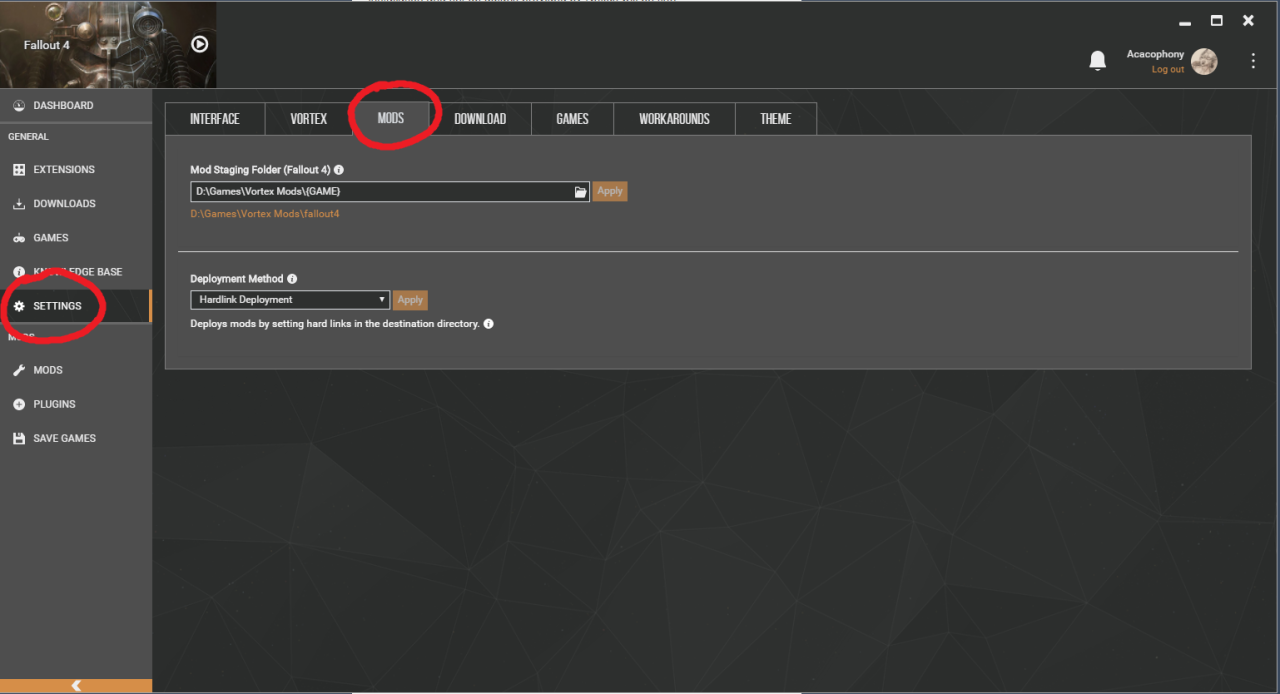
The {GAME} part tells Vortex to make a new folder for each game it is managing automatically, so that you shouldn’t need to set this manually for every game.
Now navigate to Settings -> Download.
If you’re planning on using Vortex as your primary mod manager, you will want to turn on the “Handle Mod Manager Download” button, indicated by the red arrow in the picture above.
Now, choose a location for your downloads. This must be a different directory than your mod staging folder.
As you can see, mine is set to: D:\Games\Vortex Downloads. (DO NOT set this to be your default computer downloads folder. It needs to be a permanent file location.) Navigate back to Settings -> Mods. For Fallout 4, make sure that the option under “Deployment Method” is set to Hardlink Deployment. This is why you need the Mod Staging Folder to be on the same drive as the main game, and it is the only deployment method you can use for most Bethesda games. Any errors you had related to deployment should vanish on their own now.

Restart Vortex and check that these settings have been saved before moving on to Step 1. I had to re-install Vortex once before it behaved properly.
Configure Vortex Groups
Rather than each mod being organized individually, as is the case with previous mod managers, Vortex uses a combination of mod groups and rules that define the relationships between individual mods, in order to build a load order.
Before you download any mods, you need to configure your Vortex Groups to ensure a stable load order. Groups are not the same as mod categories/classifications.
Mod categories, like the type listed on Nexus, tell you roughly what the mod changes, or what “type” of mod it is.
Mod groups are chunks of mods that all should be loaded in roughly the same place in the load order, regardless of what they contain. You have likely noticed that some mod authors specify details about general load order, such as “Load late in your load order” or “this mod can be loaded early.” The Vortex group system takes this general idea and expands on it.
The confusion can come when groups are named for the types of mods that usually have to be assigned there.
Example: Mods that edit the physical space of the world, such as city overhaul mods, always have be loaded late in your load order, or their changes might be overridden by a different mod. Therefore, one of my vortex groups is named “Worldspace Changes” because this is a handy reminder for what types of mods need to be loaded in this slot. However, Enhanced Lights and FX also needs to be loaded pretty late, and so this mod might end up in my “Worldspace Changes” mod group, rather than in the “Lighting” group, to make sure it’s after everything that would overwrite it. Mod groups are not the same as mod categories, and you can assign a mod to any group, regardless of what it does.
I chose my groups based on this guide, which was designed to help NMM users obtain the most stable load order.
It should be noted that you cannot change the names of the default Vortex groups or the rules between them, but you can add new groups and rules to the core set that is already there. I chose to make myself a master list of what I use each default group for, but you may choose to simply bypass those groups all together and make your own entire group list. Here are my groups in their load order, with a brief note of what gets put in each one. Bolded groups are custom ones that I added myself. (Some of Vortex’s default groups have changed)
DLC – Official DLC only (I don’t add any mods to this)
CC – Official CC content only (I don’t use this at all, personally)
Other ESMs – added between CC and Textures Overhauls. This group is for ESL plugins, and a few mods that use the .esp file type, but are flagged as master files, such as the Unofficial Fallout 4 Patch. Mods of this type will be flagged in your plugins with a star icon, which allows you to easily identify them.
Texture Overhauls – Textures
Fixes – Bug fixes and “quality of life” tweaks such as faster terminal loading
Vault-Tec Historical Preservation Initiative – Mods that add extra items to the settlement menu, or make changes to settlement systems
Underrides – Patches for the settlement mods
Scrap Corpse Highlighting – Gameplay and mechanics tweaks
Default – (I only use this for troubleshooting later, nothing is assigned to Default at first)
Scrap Everything – Scrap Everything, and mods that alter or add companions
Lighting – Non-Texture Aesthetic changes (such as darker nights), weather mods. My actual Lighting mods usually end up later in my load order.
Item Sorting – added after Lighting, and the beginning of a custom chain. This is for item sorting mods like Valdacil’s Item Sorting and patches for mods that were loaded earlier.
Body Replacer – for body replacer mods, hair, LMCC, and other player customization mods.
Items – For standalone Weapons, Armor, Clothes and other items. You may choose to divide these into separate categories if you prefer, but I like to have them as all one category.
Crafting – For Armorsmith, Weaponsmith, add on to those mods and compatibility patches for them. Also Crafting Workbenches, etc. Extra settlement items like furniture or paintings I would normally put in Vault-Tec Historical Preservation Initiative, but can go here if they need higher priority in the load order
Worldspace Changes – For mods that change physical cells in the world. Player home mods, city overhauls, South of the Sea, etc.
Alternate Start – Alternate Start and other “Load Last” mods.
Frost, Horizon – For Frost or Horizon (whichever one I am playing) and all of their patches.
Dynamic Patches – Final Patches, Wyre Bash patches, etc. (Mostly left empty)

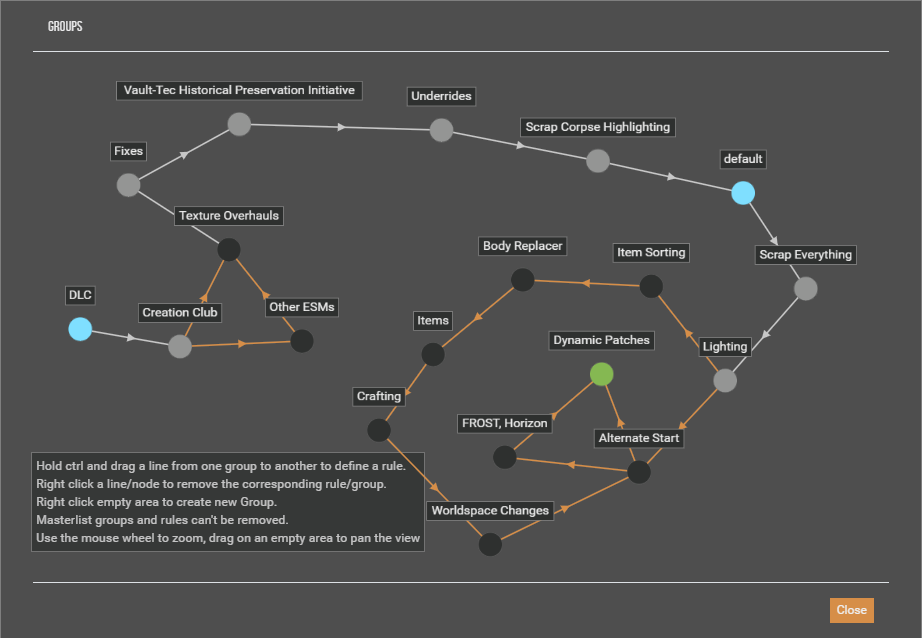
You can see in the image above what my final web looks like. As Vortex does not allow you to delete what they call “masterlist rules,” it results in these funny little loops. I have highlighted the masterlist rules that I couldn’t delete with blue dashed arrows. In the current version of Vortex, you actually can accidentally delete these rules once they turn orange like they have in the picture. DO NOT DO THIS. Doing this will break your groups and you’ll have to set them back to default and start again. Having these extra “loops” may look messy, but they don’t hurt anything. Restart Vortex before installing any mods. Please note: Vortex will rearrange the graphical web of your mods to make it fit neatly in the window, but the actual connections will all be the same. You can see that effect in the picture below. If you compare where the arrows are pointing, my groups are completely intact- it’s just rearranged where the nodes are displayed.
Install Mods
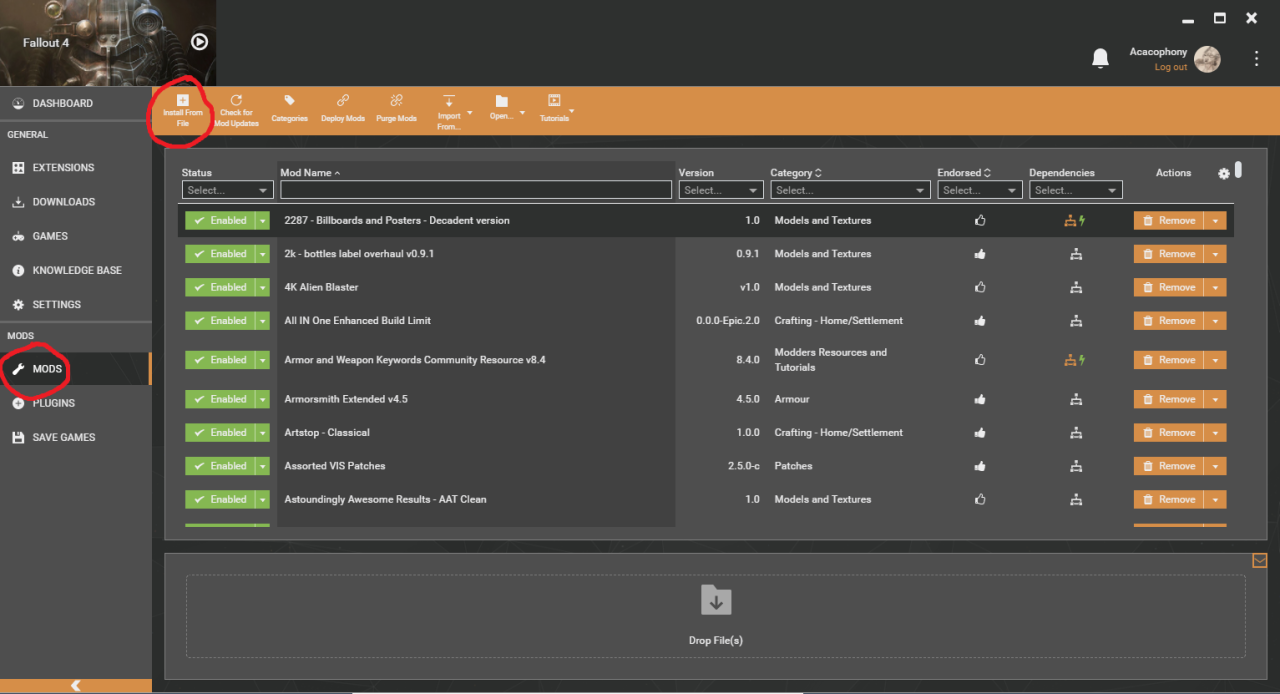
On the current Vortex patch (0.16.12) there is a bug where Vortex may occasionally fail to properly install mods that contain a plugin file (.esm, .esp or .esl). Until this is fixed, I highly recommend downloading any mods that contain plugins manually. You can add them to Vortex by selecting “Mods” from the left hand menu, and then using +Install From File option at the top of the main window. (This is no longer an issue for most mods with version 1.0+, although with very large mods, Vortex can still have problems.)
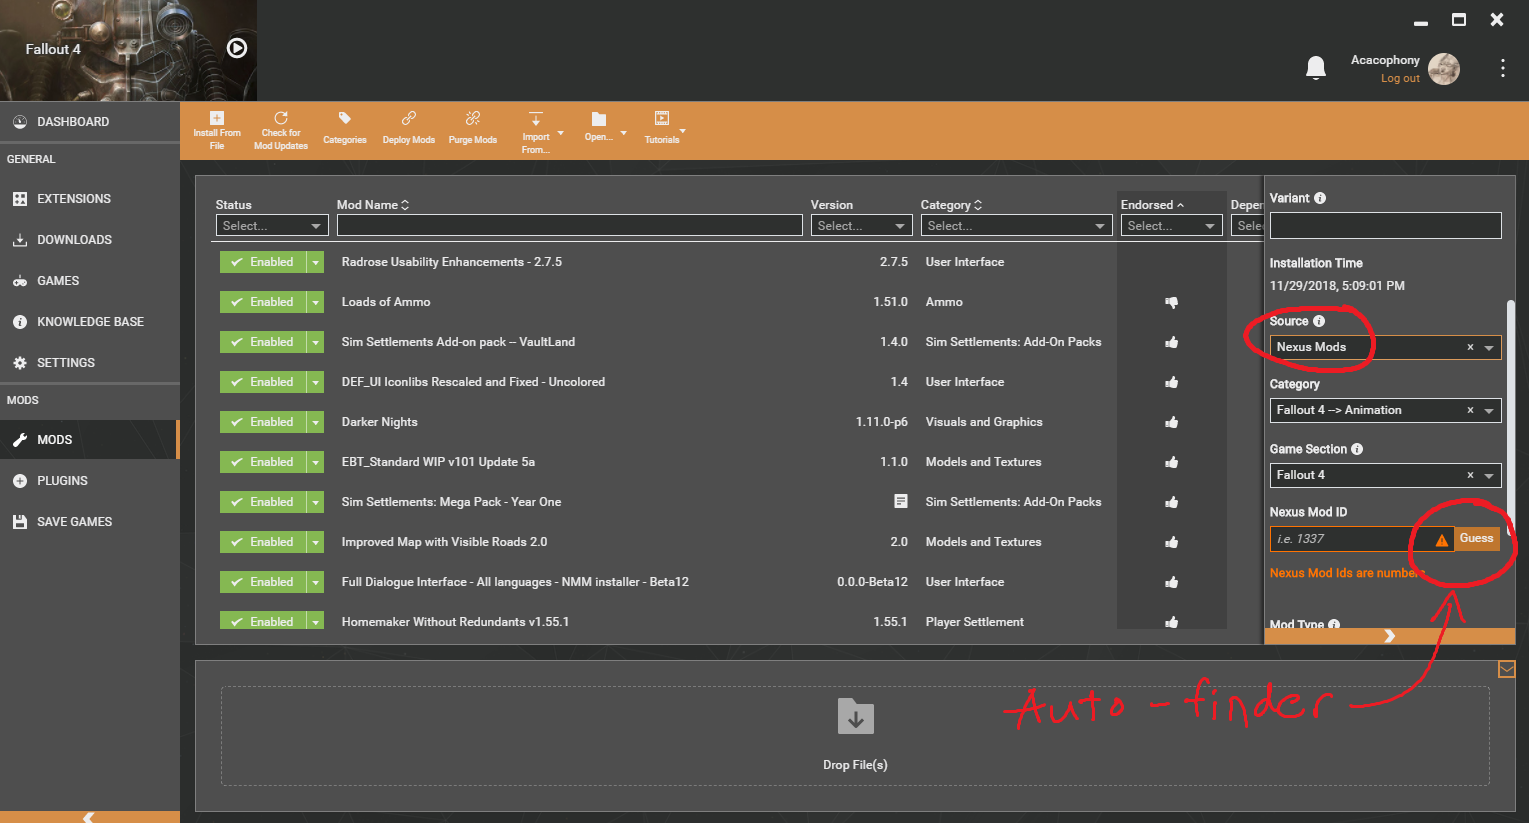
For each mod you download manually, you can double click on it after it has been added to Vortex to open the metadata. Here, you can rename the mods to more useful titles (handy for patches where the mod author named the .zip file something like “version 1.1″) and automatically make Vortex find the NMM page in order to track your endorsement and the current version. While updating the metadata is optional, I highly recommend it. It should not be necessary for mods you install using the “Download with Mod Manager” button, unless you want to rename them.

When you install a mod with a direct conflict with an existing mod, Vortex will ask you which one should be loaded later. I don’t have a screenshot of it for you, but on the error pop up, you have a button that says “Show.” Click on that, and Vortex will automatically load a filter to show the conflicting plugins. Look for the red lightning bolt symbol next to your plugin. I have circled the symbol to the right, but all of mine are green because I have already resolved my conflicts.
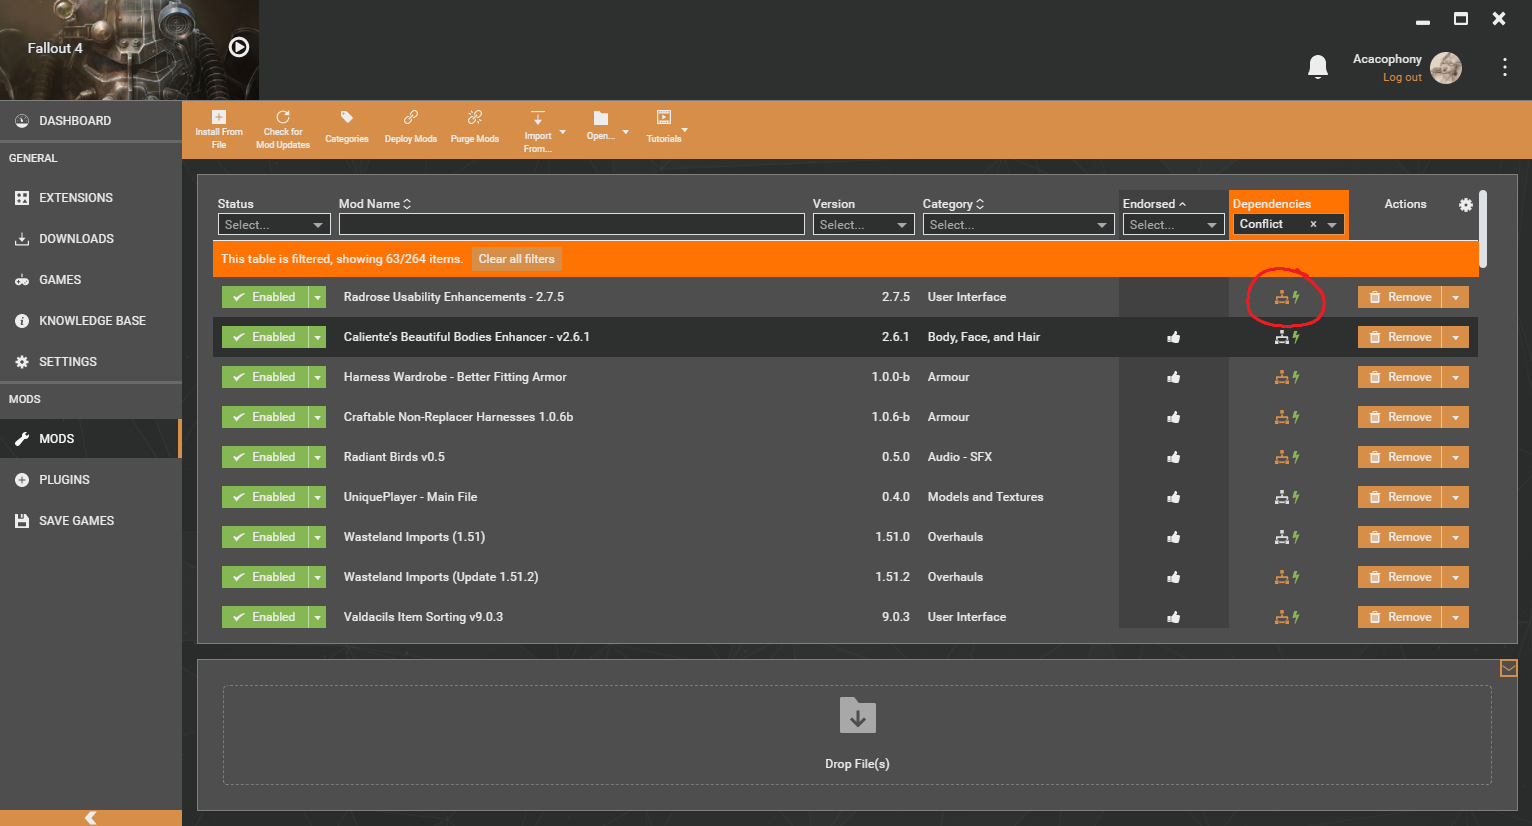
Click on the lightning bolt, and a dialog box will open with options for resolving the mod conflicts. The mod’s name is listed at the top, and then from the drop down boxes, you can choose whether or not it should load before or after the mods it conflicts with. As with other mod managers, loading after means that it overrides the mods that come before it.
So these settings mean that I am having Radrose Usability Enhancements override both Def_ui and Valdacil’s Item Sorting. Hit Save, and your errors should disappear.

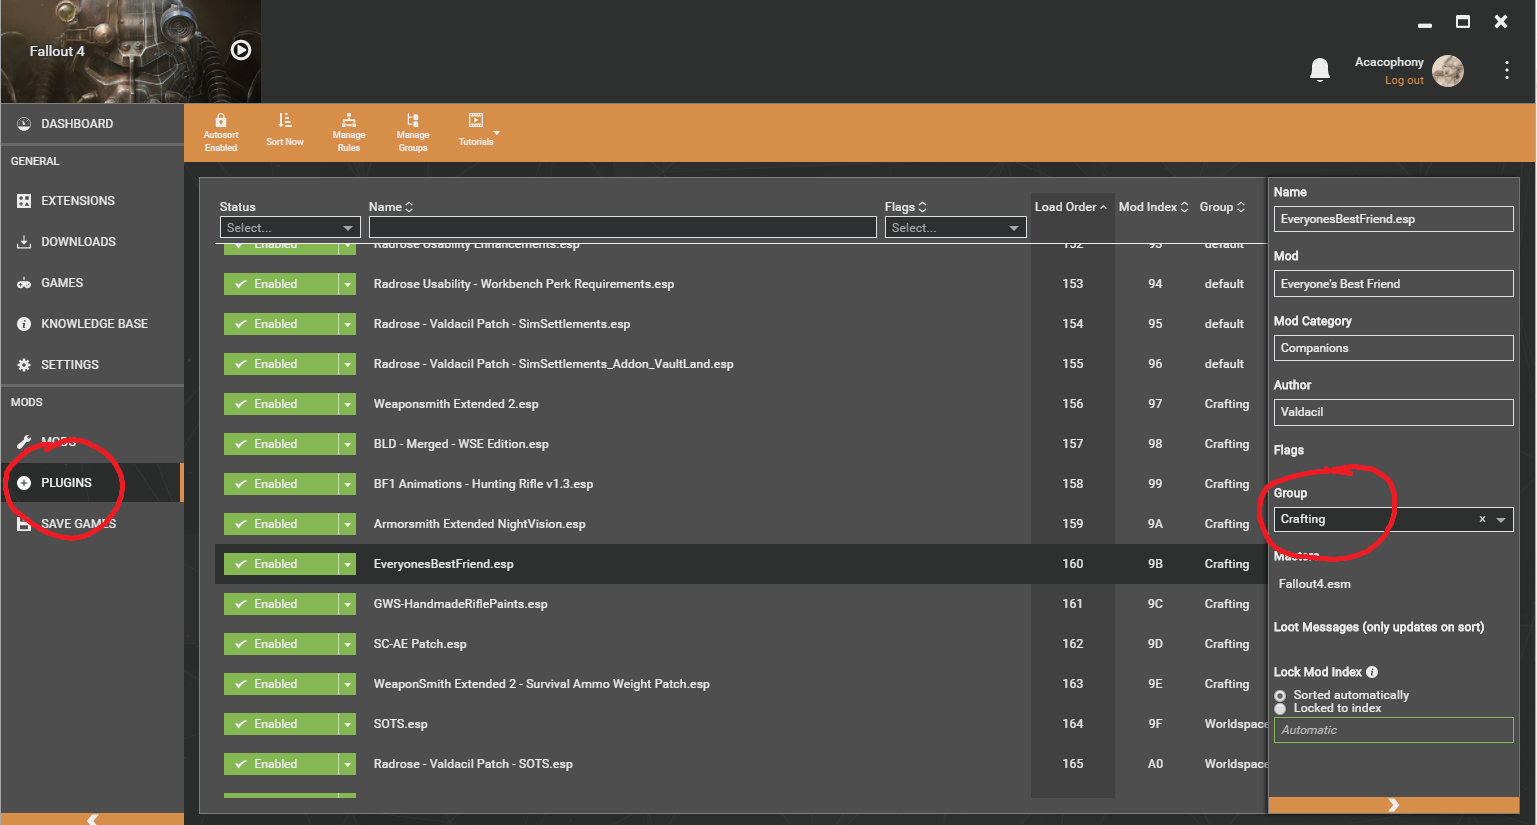
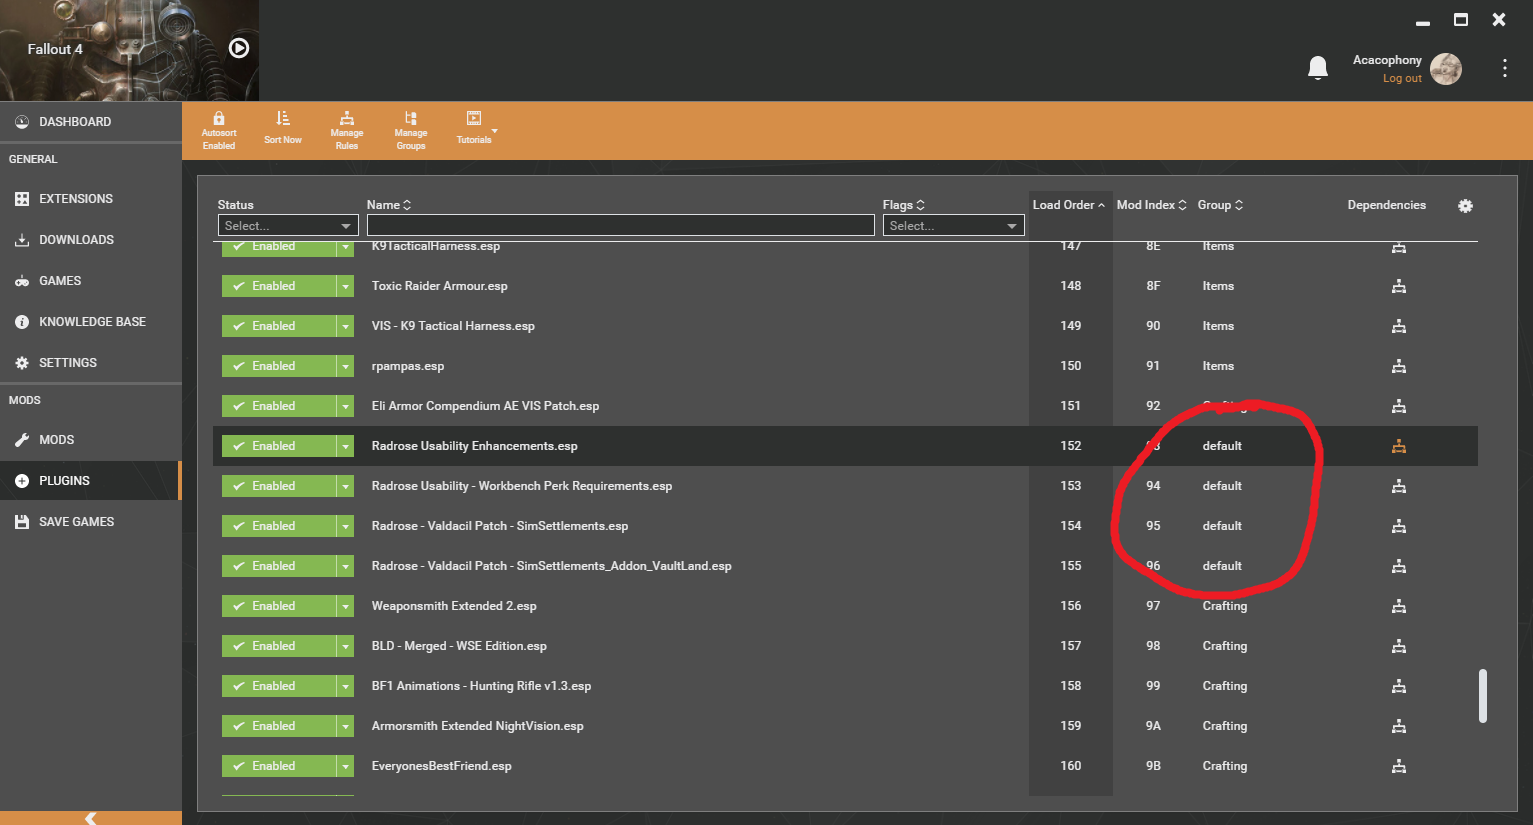
Once your mod is installed and your metadata updated, select “Plugins” from the menu. Your plugin should appear in the load order. Double click on a plugin in order to open the metadata panel, and assign it to any group other than “Default.” If the mod author has specified a location for the mod in their instructions, pick a group that will put it in roughly the right place. Otherwise, assign it to the group where mods of that type should generally go, based on the guide linked in the last section. As you add mods, you may find instructions that require re-grouping some mods. For now, don’t worry about sorting mods that are within the same group as each other. You will take care of that in the next step, but trying to worry about that this early on will lead to a lot of problems and make things harder on you than they need to be.
Example: In the instructions for Weaponsmith Extended 2, it’s mentioned that you should load Everyone’s Best Friend after this mod. By my normal group rules, I would place Everyone’s Best Friend mod into “Scrap Everything” – The group I use for my companion alteration mods. However, because Weaponsmith Extended recommends loading this mod later, I will need to assign Everyone’s Best Friend to the same group as Weaponsmith – “Crafting” – or any group that is loaded after it. After I’ve placed Everyone’s Best Friend into the “crafting” group, I can leave it alone for now- even if it’s currently loading before weaponsmith- we will take care of these kinds of issues later. In the beginning, don’t leave any mods in the default group. Use this group for troubleshooting only.
Troubleshooting Cyclical Rules
As you add more mods, you will eventually get the error “Plugins cannot be sorted due to cyclical rules.” This is a normal part of the process, and it means that Vortex’s built in sorting has encountered a hidden conflict between mods. (NOTE: Vortex can now automatically move mods to different groups when this happens, so this is far less likely to happen to you.)
– Click on “More…” to bring up the dialog box about the error. Although I don’t have a screenshot for you, it will supply a list of mods that are involved in the issue. The actual message might appear to be nonsense to you- don’t worry about it. Just look at the names of the mods and make note of which mod in the list you installed most recently.
– Close the dialog and click on “Plugins” on the left hand side. Find the plugin for the most recent mod you installed that was listed by the error.
– Change its group designation to “Default”
– Dismiss the error message. The message will not go away on its own, so it’s vital to do this before sorting so that you can identify when the issue has been solved.
– Click on “Sort Plugins” and allow Vortex to try to sort
If the message appears again, repeat with the next most recently installed mod, OR you can choose a mod name that keeps appearing in the error box if you’ve noticed the same one over and over. Do this until the plugins sort successfully. Once they have, you can start trying to re-group these plugins one at a time, until you find the one that is causing an error. You may end up with an irreducible minimum of mods that cannot be moved out of the “default” group. Leaving them there won’t hurt anything. While resolving these conflicts, ONLY use group assignments for now.
Fine Tuning
Once your mods are fully installed, assigned to a group, and you have resolved all cyclical rule issues, you can start optimizing your load order.
Vortex uses a modified and improved version of LOOT automatically, so you do not need to install and run LOOT at all. Instead, I recommend that you use xEdit to ensure the best compatibility between all of your mods. While light or beginning mod users may be intimidated by xEdit, using it to find conflicts isn’t as hard as it looks, and it will result in a much more stable load order and allow you to get the most out of every mod you have installed.
Download Fo4Edit and install it according to the instructions.
When you run it for the first time, a dialog box will pop up giving you the option to select different plugins. By default, everything should be selected except for the Fallout4.esm and the official DLC files. If for some reason these are not the settings, change them to this.
(Update Dec 2018: These screenshots are from the previous version of xEdit, so the UI looks a little different now. You should still be able to find all of these options, though.)
Click OK, and let xEdit load. (I cut a small chunk from the original here about xEdit taking a long time to load. It still does take awhile but it’s much faster than it used to be.)

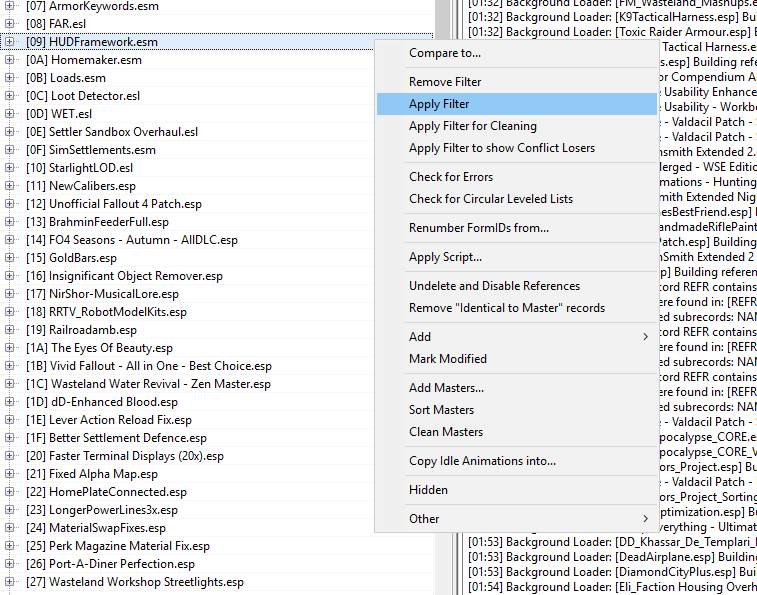
Once it has loaded, right click somewhere on the plugin list in the left hand panel (doesn’t matter where). A menu will pop up. Select “Apply filter.” (xEdit has updated yet again. It now has an option where you can simply right click and select “apply filter for conflicts” or something like that, and it does it automatically. Much easier. The process of finding and resolving conflicts is still the same.)
A new dialog box will pop up. Choose the following settings, and leave the rest blank.

Allow xEdit to load again. This might take much longer than the first time. Go talk to other humans or play with a pet or something while you’re waiting. Again, it may become unresponsive. Do not panic and force quit it. (Again, the newest version is much faster, but this part still does require some waiting.)
Once it has finished, you should see that the plugins listed on the left hand panel should be color coded with Red, Orange, Yellow and Green. Scroll down to the bottom of your load order and work your way up.
Look for plugins listed in red. Click to expand the plugin and see the individual records, and find the ones listed in the red. When you click on them, the right hand panel will display all the mods which are overriding that one.

In this case, in the right hand (large) panel, I can use the horizontal scroll to find the current mod I’m looking at and see what is overriding it. As I can see here, the information being “overridden” is simply cell size information, which is missing in the QuazScavengerApartment file. This is fine- it’s not a conflict that should be overriding any part of the player home.

You will always have mods being overriden, and that’s okay. Your goal is to examine what records they are changing to make sure that the overrides are ones you’re okay with. Read the Conflict Detection and Resolution page from Github for more details about how to do this.
As you work with xEdit, you’ll start to get a sense for what some of the records do, and you can make informed decisions about how you want these mods to affect your game. As an example, here, I have Damn Apocalypse, which is a mod that makes loot much more scarce, overriding some clothing mods that added clothes and armor into the leveled lists for vendors.
I decided that I would rather have less loot than worry too much about these clothes appearing in vendor’s inventory. If I want those clothes, they will still turn up in other areas, and it’s more important to me to have less loot. While there are ways for me to merge those leveled lists into one patch and make the clothes show up, I decided it’s not really worth the effort for me. This conflict will not hurt anything in my game, it just means those clothes won’t appear in some shops. (Making a merged patch with xEdit for leveled lists is intermediate user territory, but you’re a long time mod user, you probably know how to do this already.)

If you find mods that are conflicting and you need to rearrange them, you must first move them into the same Vortex group. Setting rules between individual mods when they are in different groups will often cause nonsensical cyclical rule errors.
Example: Say that I have Enhanced Lights and FX installed, and I assigned it to the “Lighting” mod group in Vortex when I first downloaded it. I also have Start Me Up installed, and assigned that to the “Alternate Start” group in Vortex. After running the filter in xEdit, I notice that Start Me Up is overriding all of those lovely lighting changes I wanted from Enhanced Lights and FX. I need to put them in the same mod group before I try to set any rules to tell Vortex which mod to load later.
Go to the plugins section of Vortex.
Change the “Group” of the mod is being overridden to be the same group as the last mod overriding it. If Enhanced Lights and FX is being overridden by a Diamond City overhaul, which is in the “Worldspace” group, AND by Start Me Up, which is in the lower loading “Alternate Start” group, you will need to place Enhanced Light and FX in the “Alternate Start” group.
Click on “Sort Now” at the top of the plugins window. If any Cyclical Rule error appear, you may need to rearrange more than one mod, but if you’ve been resolving these errors as you go according to these instructions, you shouldn’t have too many problems at this stage. (Again you probably won’t encounter this anymore, but you might see some of your plugins get moved to different groups. Vortex does this ONLY to avoid serious load order instability.)
Click on the little symbol to the right of the mod, in the “Dependencies” column, and drag it down to the connect it to the mod that is overriding it.

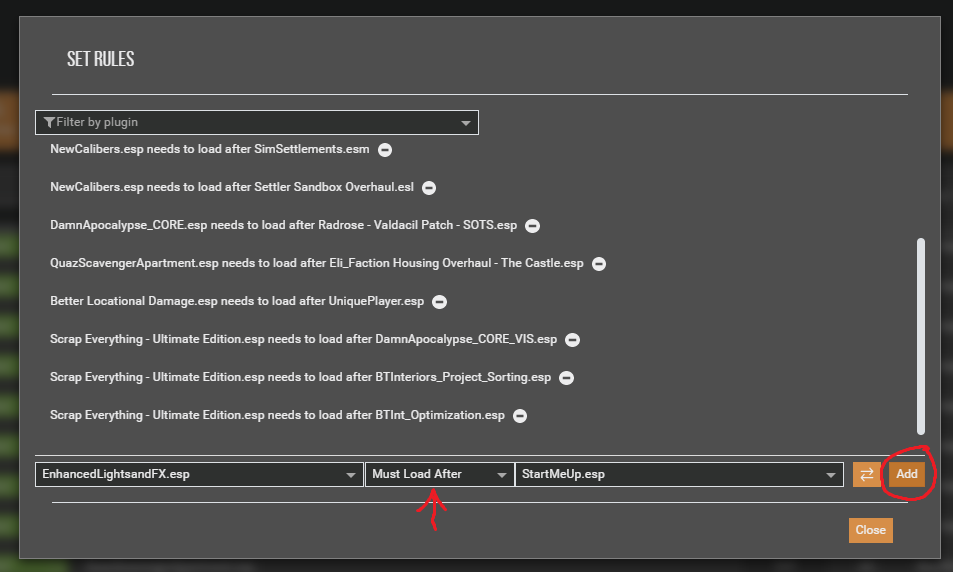
A new dialog box will open with the rule settings. It should be automatically set to “Must Load After.” Click “Add” and then click “Close.”
In order to avoid cyclical rule errors, only apply individual rules to mods within the same mod group. If you need to add a rule for a mod in a different group, always sort them into the same group first. If you try to make rules between mods in different groups, you will get cyclical rule errors that will be extremely hard to resolve and make no sense.
With the current version of Vortex, you cannot drag and drop mods to rearrange them. (Use the feedback function to politely ask the devs for this feature, hopefully they will change their minds and decide to implement it.) (The devs have stated that vortex will never have a manual drag and drop system like that, but now that it automatically sorts out critical errors, the feature is less necessary.)
Once you have done this for all of the mods being overridden, your load order should be stable and ready!